Add a student
Add a student in two short steps, scan the passport to save typing, and find them again in the Students list.
- 5 min
- 6 steps
- For organizations
Adding a student takes two screens: who they are, and where they apply. The student's page with the document checklist opens right after. Anyone whose role has Edit Students can do it, and partners add students the same way from their own console.
Step 1
Open Add student
In the sidebar, open “Students” and press “Add student” at the top right. The dashboard has the same button.
The first screen, “Who is the student?”, asks for the details exactly as they are printed in the passport.
Step 2
Scan the passport or type the details
Press “Scan a document” and choose a photo or PDF of the passport's photo page. The name, passport number, date of birth and nationality are read into the empty fields; anything you already typed is kept. Check every value.
Or type them: “Full name” (English or Chinese letters only), “Passport number” and “Date of birth”, then “Applying for” (the level) and “Intake”, which lists the open intakes. Phone, Email and Nationality are optional. Answer “Is the student in China now?”: Yes makes the residence permit, visa, good-conduct and attendance certificates mandatory. Under “Partner”, choose whose student this is, or keep your organization if nobody referred them. Press “Next: universities”.
Tip: The passport scan is an AI scan and uses 3 credits from your organization. A scan that fails gives them back, and typing the details yourself is free.
Step 3
Choose the universities
On “Where do they apply?”, press “Add university”. Search by name or city, open a university and pick a programme, or type the major. Programmes for the level you chose are shown first. Add as many as you need; the application fees to pay are totalled under the list.
You can also skip this step and add universities later on the student's page.
Tip: A university or programme past its deadline for the student's intake is greyed out. Only an owner or admin can still add it, with “Add anyway, past the deadline”, and only when the university has agreed to a late application.
Step 4
Check the passport details once more
Press “Add student with 1 university” (or “Add student without a university”). A last check, “Check these against the passport”, shows the full name, passport number and date of birth in large type. Compare each with the passport's photo page, then press “They match, add student”, or “Go back and fix”.
Tip: These three cannot be changed once the student is added. Only your organization's owner can correct them later.
Step 5
Upload the documents on the student's page
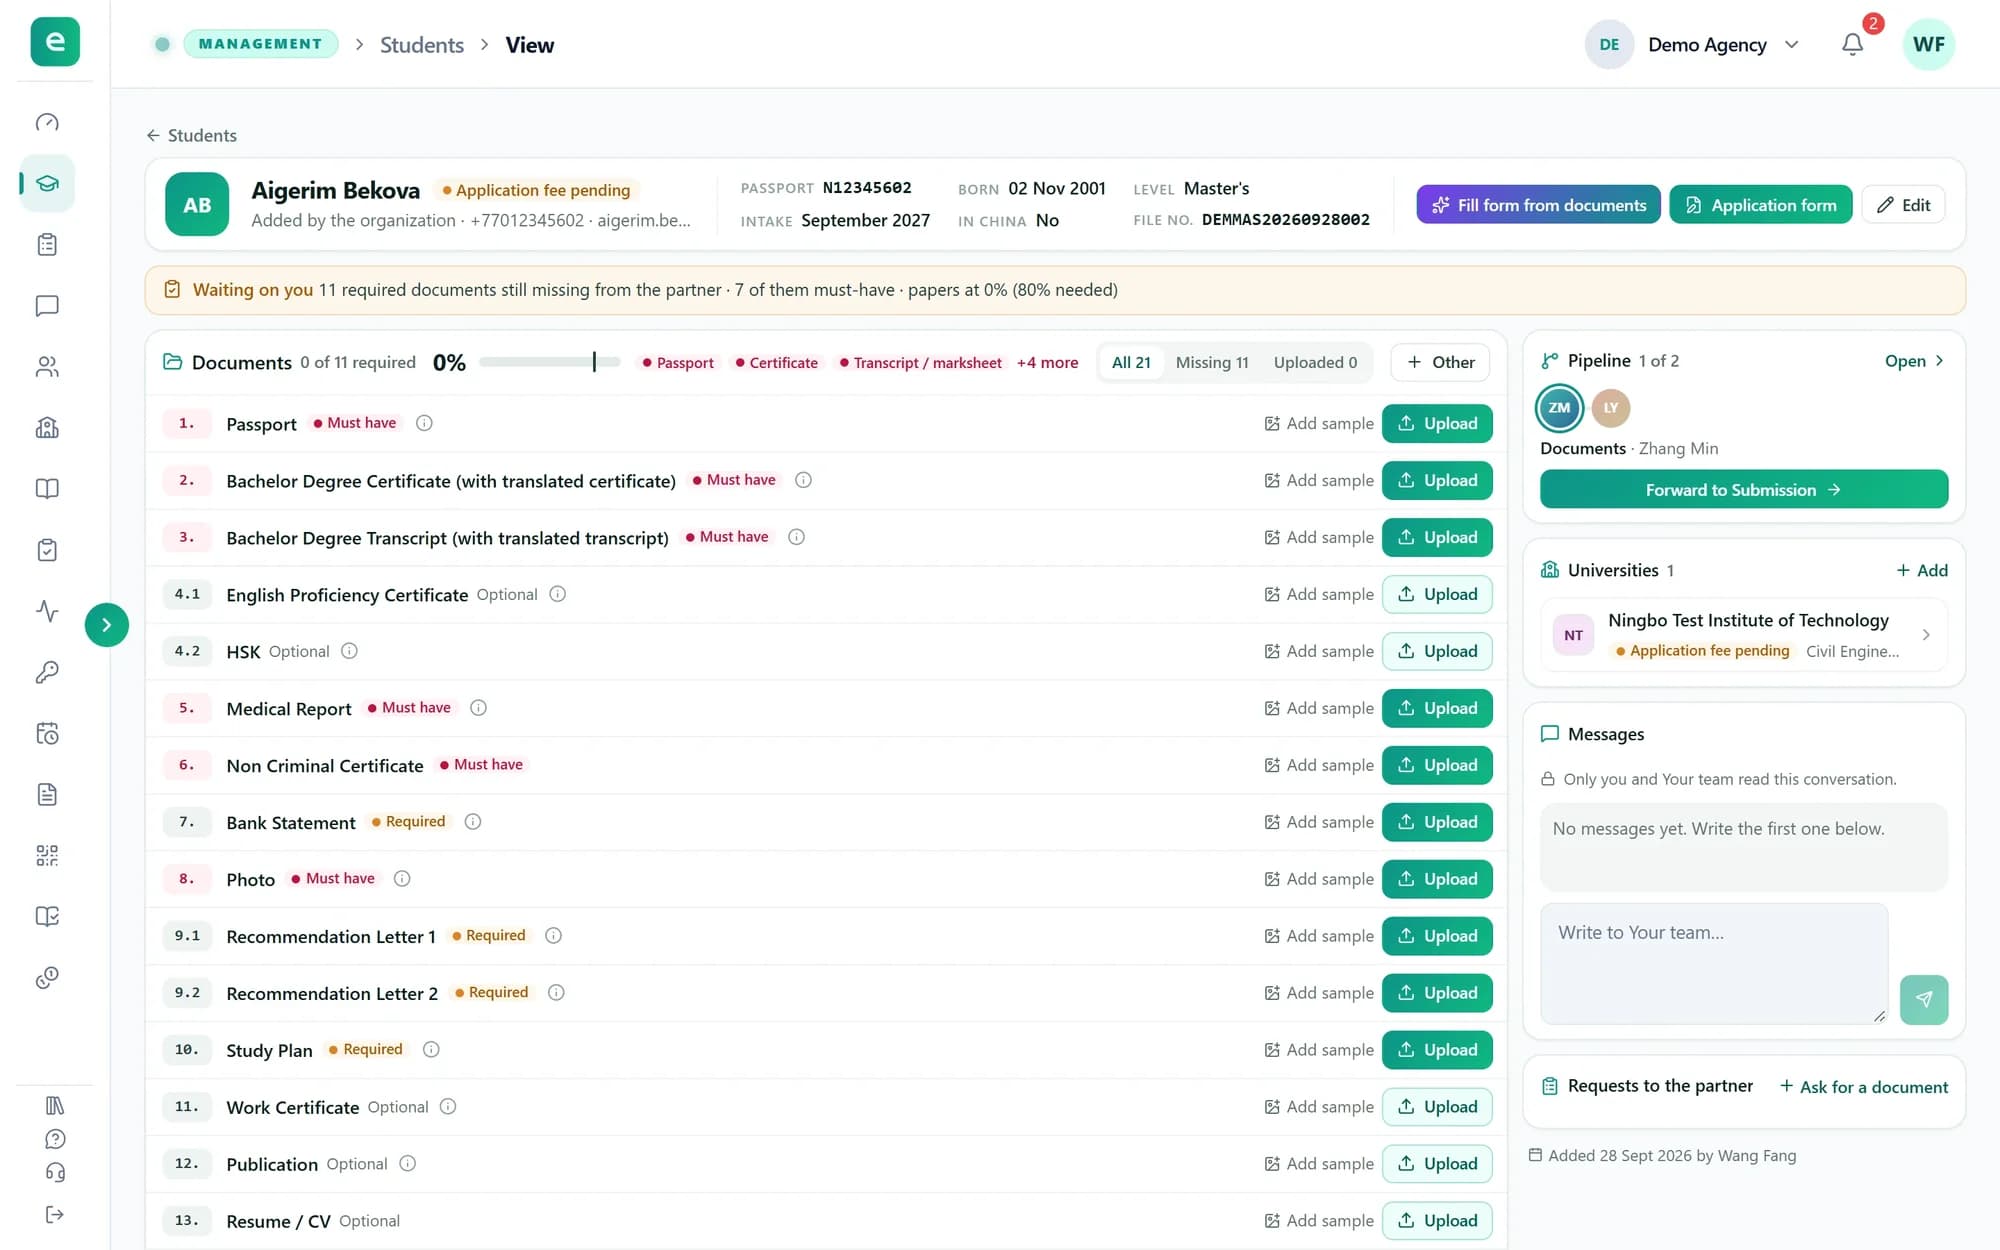
The student's page opens. “Documents” is the checklist for the student's level: each paper is marked Must have, Required or Optional and has its own “Upload” button, and “Other” adds a file that is not on the list.
On the right are the pipeline card with “Forward to …”, the student's Universities with “Add”, Messages, and “Requests to the partner” with “Ask for a document”. At the top are “Fill form from documents”, “Application form” and “Edit”.
Step 6
Find students in the list
“Students” lists every student from every partner. The tabs above the list count students by stage, such as New, Documents needed and Application fee pending; a stage with nobody in it is left out. Search by name or passport number, choose a partner, a pipeline step (“Any step”) or a member (“Anyone”), or open “Filters” for degree level, university, programme, major and country.
Members who are not owners or admins see the students of the partners they are assigned to, sorted into With me, Forwarded, Completed and All assigned.
Tip: “Removed” shows the students you took off your lists and restores them. Removing a student deletes nothing.
What you have now
The student is on your list with their universities, and their document checklist is waiting for files.